WEB170 » Creating a WordPress Theme From a Template
If you plan on being a professional website designer or developer, you should really consider creating your own theme.
For instance, maybe your wife works at a Physical Therapy clinic and needs a new website. Let’s also say that you have designed said website and have produced said templates from said visual design. You will need to then produce said WordPress protosite from said templates, hypothetically speaking of course. ;-)
Well… How do you start a theme from your templates?
Step One: Install Your Template as a New Theme
Let me explain by using a demo set of templates that I created to use for this class based off of the design I use for my Web Design Studio class:
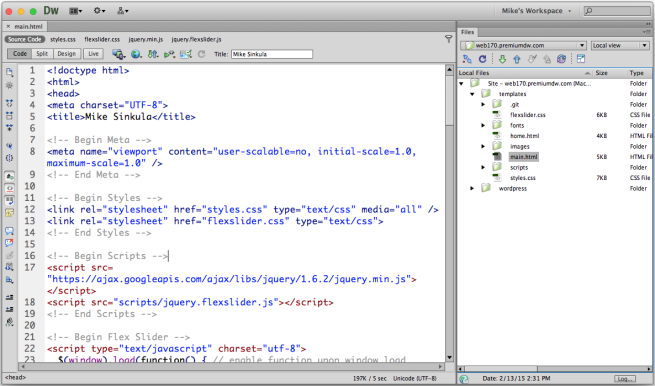
My Demo Set of Templates
See Also: https://github.com/msinkula/web170-templates
First, we will need to make a copy of this template and place it in our themes folder and rename it so we have it to work on:
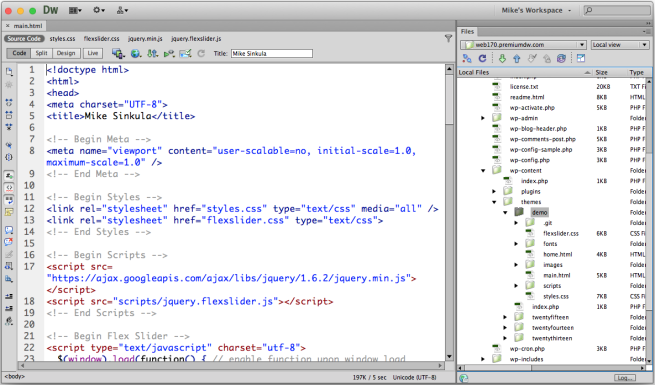
My Demo Theme in My Themes Folder
Next, we will need to make sure we have the essential files for a WordPress theme…
1) Index (index.php)
Go ahead and open your main.html template file and save it as index.php:

Save Your Main Page Template as Your Index Template File
2) Main Styles (style.css)
WordPress relies heavily on the presentation styles within CSS. With the use of Themes, you have an almost infinite choice of layout options. WordPress Themes make it easy to change your website look, and open up the field to help you create your own Theme and page layout.
See Also:
Open your main style-sheet and save as style.css:

Save Your Main Style Sheet
Here is where you will also need to include the style-sheet header information in order for WordPress to use this new theme.
See Also: http://codex.wordpress.org/Theme_Development#Theme_Stylesheet
It’s also a good idea if I use the WordPress Core Generated Classes as well.
See Also: http://codex.wordpress.org/CSS#WordPress_Generated_Classes
3) Functions (functions.php)
A theme can optionally use a functions file, which resides in the theme sub-directory and is named functions.php This file basically acts like a plugin, and if it is present in the theme you are using, it is automatically loaded during WordPress initialization (both for admin pages and external pages).
Let’s create the functions.php file for our theme to use:

The Functions File
Suggested uses for the functions file are to:
- Enable Theme Features such as Sidebars, Navigation Menus, Post Thumbnails, Post Formats, Custom Headers, Custom Backgrounds and others.
- Define functions used in several template files of your theme.
- Set up an options menu, giving site owners options for colors, styles, and other aspects of your theme.
4) The Screenshot (screenshot.png)
Create a screenshot for your theme. The screenshot should be named screenshot.png, and should be placed in the top level directory. The screenshot should accurately show the theme design and be saved in PNG format.
Let’s make a screenshot.png of our theme to use:

screenshot.png
See Also: http://codex.wordpress.org/Theme_Development#Screenshot
Once you have done this, you can upload your new theme to use.
Upon upload, you should now see it in by going to Appearance > Themes:

My Demo Theme is Now There!
Well… no time like the present… Let’s activate it and preview:

Uh, Oh. :-(
Well… our theme is active. But, why doesn’t it work? The answer…
Step Two: Add the WordPress Functions to Your Theme
The files of WordPress define many useful PHP functions. Some of the functions, known as Template Tags, are defined especially for use in WordPress Themes. There are also some functions related to actions and filters (the Plugin API), which are therefore used primarily for developing Plugins. The rest are used to create the core WordPress functionality.
See Also: http://codex.wordpress.org/Function_Reference
Let’s take a look at some of the basic WordPress functions that you will need to incorporate into your template files and see how they work.
1) bloginfo
The Blog Info function does all sorts of things relative to the information of your blog (or website).
It is also the function that we will use to call the style-sheet for our site:

Using the Bloginfo Function to Call Your Style-Sheet
1 |
<?php bloginfo('stylesheet_url'); ?>
|
See Also: http://codex.wordpress.org/Function_Reference/bloginfo
Once we place that in our file, our style-sheet will load:

My Style Sheet has Loaded!
There are other places that we will need to use the Blog Info function as well.
If at any time we need to look into our theme folder to find anything else like a JavaScript or an image, we will need to use the Blog Info function to do that as well.
For instance, I have a JavaScript sitting in a scripts folder as well as another style-sheet that I need to point to for my flexslider gallery that I will be placing on the home page:

Using the Bloginfo Function to Call a JavaScript
If we have any images that we need to dig out of our images folder, we will need the Blog Info function to do that as well:

Using the Bloginfo Function to Call an Image
1 |
<?php bloginfo('template_directory'); ?>
|
Why stop there… Let use the Blog Info function to call the tagline of our site for our title tag:

Using the Bloginfo Function to Call the Site Tagline for the Tile Tag
1 |
<?php bloginfo('description'); ?>
|
… and use it again to call the name of our site for our title tag:

Using the Bloginfo Function to Call the Site Name for the Tile Tag
1 |
<?php bloginfo('name'); ?>
|
This should make for the start of well written title tag. Don’t worry we’ll make it a bit more SEO friendly in a bit.
See Also: Search Engine Optimization (SEO) in WordPress without Using a Plugin | Premium Design Works
2) body_class
The Body Class function writes a series of classes into your body tag depending on which page the user is on. This is extremely helpful when you want to make things look a bit different (given where the user is) using only CSS.
Insert this inside of your <body> tag:

The Body Class Function
1 |
<?php body_class(); ?>
|
See Also: https://codex.wordpress.org/Function_Reference/body_class
3) wp_head
The WP Head function allows your theme to pull in any linked style-sheets, JavaScripts, etc. into the head section of your theme.
Put this template tag immediately before </head> tag in your theme:

The WP Head Function
1 |
<?php wp_head(); ?>
|
See Also: http://codex.wordpress.org/Function_Reference/wp_head
4) wp_footer
The WP Footer function also allows your theme to pull in any JavaScripts, etc. into the end of your theme. This is where the code for the Toolbar will live.
Put this template tag immediately before </body> tag in your theme:

The WP Footer Function
1 |
<?php wp_footer(); ?>
|
See Also: http://codex.wordpress.org/Function_Reference/wp_footer
These are certainly not all of the functions that we will use in our theme. But, it is certainly a good start.
Step Two: Create the The Loop for Your Theme
The Loop is used by WordPress to display each of your posts. Using The Loop, WordPress processes each of the posts to be displayed on the current page and formats them according to how they match specified criteria within The Loop tags. Any HTML or PHP code placed in The Loop will be repeated on each post.
See Also: http://codex.wordpress.org/The_Loop
Currently, our content is hand coded into our template:

Our Hand Coded Content Looks So Pretty
But, for WordPress to render our content, we are going to need to pull the content from the text editor for each page or posting into our website.
We do this by using The Loop and a few more functions:

The WordPress Loop in Action
1 2 3 4 |
<?php if ( have_posts() ) : while ( have_posts() ) : the_post(); // start the loop ?>
<h2><a href="<?php the_permalink(); // link to the page or posting ?>"><?php the_title(); // get the page or posting title ?></a></h2>
<?php the_content(''); // get page or posting written content ?>
<?php endwhile; endif; // end the loop ?>
|
Let me explain what is happening here in a bit more detail…
Your standard loop starts like this:
1 2 3 |
<?php if ( have_posts() ) : while ( have_posts() ) : the_post(); // start the loop ?>
<!-- Page Content Goes Here -->
<?php endwhile; endif; // end the loop ?>
|
This is where WordPress says:
- “Are the postings to show?”
- “There Are?! Great! Then, while there are postings to be shown…”
- “…I will show the contents of them!”
Seriously. WordPress can talk like that. Don’t question. Just believe.
Then, WordPress will want to show some specific parts of the posting.
The one’s that I used are:
1) The Tile
The Tile displays or returns the title of the current post. This tag may only be used within The Loop.
1 |
<?php the_title(); ?>
|
See Also: http://codex.wordpress.org/Function_Reference/the_title
The Permalink displays the URL for the permalink to the post currently being processed in The Loop. This tag must be within The Loop, and is generally used to display the permalink for each post, when the posts are being displayed.
1 |
<?php the_permalink(); ?>
|
See Also: http://codex.wordpress.org/Function_Reference/the_permalink
3) The Content
The Content displays the contents of the current post. This template tag must be within The Loop.
1 |
<?php the_content(''); ?>
|
See Also: http://codex.wordpress.org/Function_Reference/the_content
If we go and preview our site now, we should see the two postings on our home page with links:

My Home Page
If we click one of the links, we will go to that single posting:

The Single Posting
I know that it’s hard to tell, but they are different. And, we now have a good start to our theme!
To continue, let’s go to Creating a Navigation & Menu System for a WordPress Theme.
This portion of the Premium Design Works website is written by Mike Sinkula for the Web Design & Development students at Seattle Central College and the Human Centered Design & Engineering students at the University of Washington.


4 Comments:
Here is a nice 3-part video tutorial (Screencasts #25-27) on Designing for WordPress. This takes you from install to customizing an existing template.
http://css-tricks.com/video-screencasts/25-designing-for-wordpress-part-one/
CSS-Tricks has a ton of other podcast videos that are helpful.
Doesn’t the urchin tracker in your footer include that came with your theme mess with your analytics?
Yes, all of you should delete my analytics code from the footer file.
for those of you who may need a little help with PHP (like me) I found this great little cheat sheet: http://www.addedbytes.com/cheat-sheets/php-cheat-sheet/
you can download a PDF of it and refer to it whenever you need it. Its good to keep the URL handy since it explains the document “chunks” to you in case you really really need help with PHP (like me.)
Trackbacks: