HCDE532 » Creating Your First Web Page
Now that you have set up your server space, Let’s take a look at creating your first Web Page!
View: http://faculty.washington.edu/sinkum/create-your-first-webpage/
Code: https://github.com/msinkula/HCDE598/tree/master/create-your-first-webpage
Step One: Login To Your Server
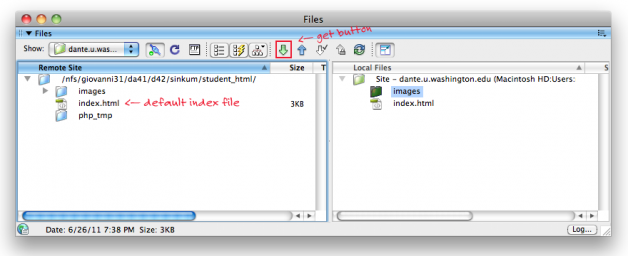
When you log into your web server, you will see a default index.html file that we will over-write when building our first web page:
Step Two: Create a New HTML5 Page
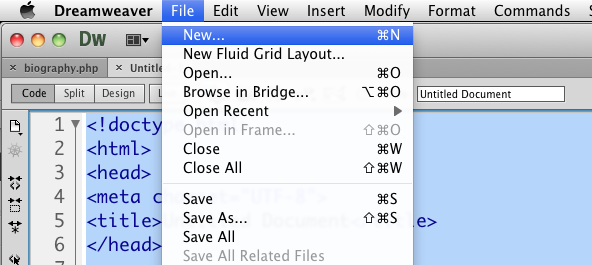
You can use Dreamweaver to create a new HTML5 page for you by choosing File > New:
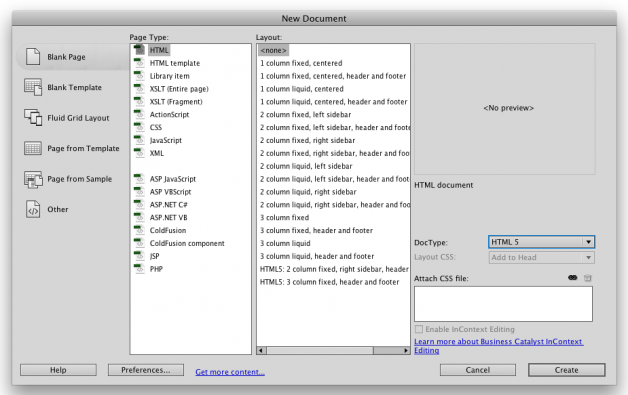
You will then want to create a “Blank” HTML page with the DocType set to HTML5:
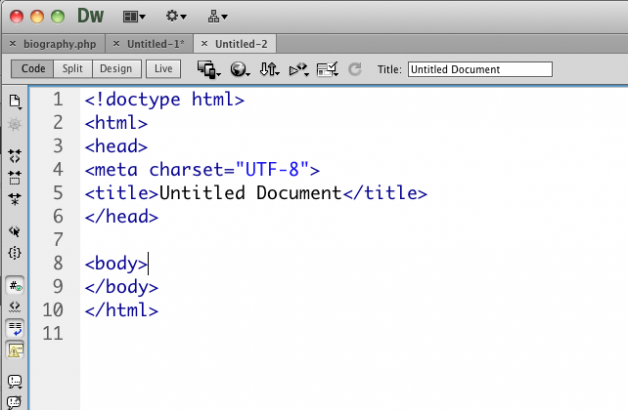
Once you create this page, you should see a blank HTML5 page in your code pane:
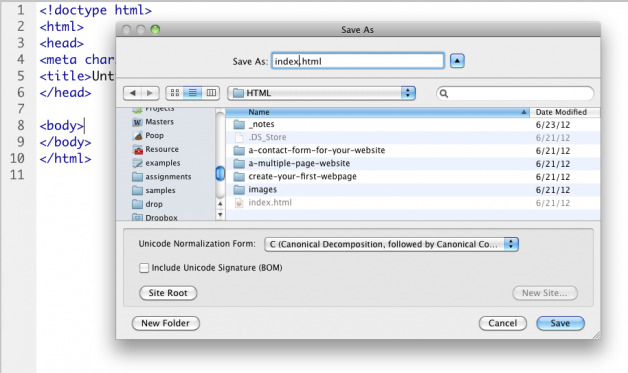
You can then save this new file as your “index.html” file:
Step Three: Add Some Content
You can now add some content to your page between the body tags.
Lectures:
- The Building Blocks of HTML | HCDE532 | Students of Premium Design Works
- The Basics of HTML & CSS | HCDE532 | Students of Premium Design Works
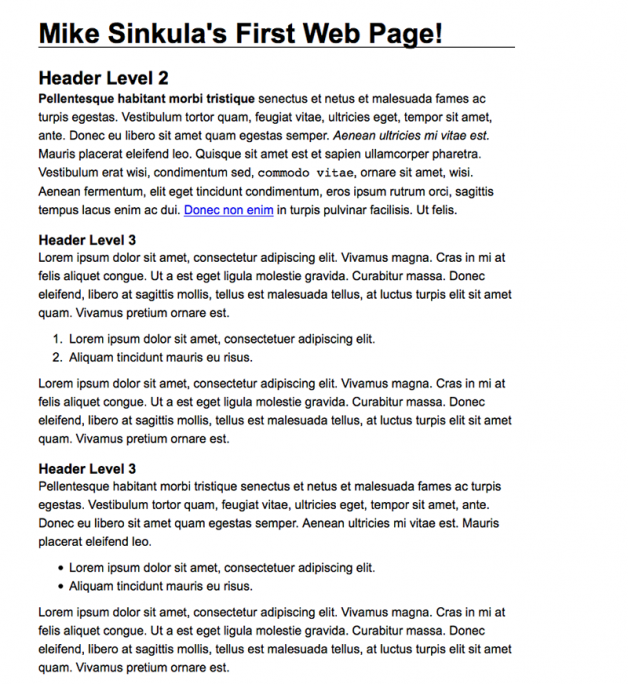
I will be using the whole kitchen sink for my content:
1 2 3 4 5 6 7 8 9 10 11 12 13 14 15 16 17 18 |
<h1>Mike Sinkula's First Web Page!</h1>
<h2>Header Level 2</h2>
<p><strong>Pellentesque habitant morbi tristique</strong> senectus et netus et malesuada fames ac turpis egestas. Vestibulum tortor quam, feugiat vitae, ultricies eget, tempor sit amet, ante. Donec eu libero sit amet quam egestas semper. <em>Aenean ultricies mi vitae est.</em> Mauris placerat eleifend leo.</p>
<p>Quisque sit amet est et sapien ullamcorper pharetra. Vestibulum erat wisi, condimentum sed, <code>commodo vitae</code>, ornare sit amet, wisi. Aenean fermentum, elit eget tincidunt condimentum, eros ipsum rutrum orci, sagittis tempus lacus enim ac dui. <a href="#">Donec non enim</a> in turpis pulvinar facilisis. Ut felis.</p>
<h3>Header Level 3</h3>
<p>Lorem ipsum dolor sit amet, consectetur adipiscing elit. Vivamus magna. Cras in mi at felis aliquet congue. Ut a est eget ligula molestie gravida. Curabitur massa. Donec eleifend, libero at sagittis mollis, tellus est malesuada tellus, at luctus turpis elit sit amet quam. Vivamus pretium ornare est.</p>
<ol>
<li>Lorem ipsum dolor sit amet, consectetuer adipiscing elit.</li>
<li>Aliquam tincidunt mauris eu risus.</li>
</ol>
<blockquote><p>Lorem ipsum dolor sit amet, consectetur adipiscing elit. Vivamus magna. Cras in mi at felis aliquet congue. Ut a est eget ligula molestie gravida. Curabitur massa. Donec eleifend, libero at sagittis mollis, tellus est malesuada tellus, at luctus turpis elit sit amet quam. Vivamus pretium ornare est.</p></blockquote>
<h3>Header Level 3</h3>
<p>Pellentesque habitant morbi tristique senectus et netus et malesuada fames ac turpis egestas. Vestibulum tortor quam, feugiat vitae, ultricies eget, tempor sit amet, ante. Donec eu libero sit amet quam egestas semper. Aenean ultricies mi vitae est. Mauris placerat eleifend leo.</p>
<ul>
<li><a href="#">Lorem ipsum dolor sit amet, consectetuer adipiscing elit.</a></li>
<li><a href="#">Aliquam tincidunt mauris eu risus.</a></li>
</ul>
<p>Lorem ipsum dolor sit amet, consectetur adipiscing elit. Vivamus magna. Cras in mi at felis aliquet congue. Ut a est eget ligula molestie gravida. Curabitur massa. Donec eleifend, libero at sagittis mollis, tellus est malesuada tellus, at luctus turpis elit sit amet quam. Vivamus pretium ornare est.</p>
|
See Also:
- HTML Elements | W3 Schools
- HTML Links | W3 Schools
Get Some:
Step Four: Create an Internal Style Sheet
Now that we have added our markup for our content, it is time to give it a proper presentation.
Lectures:
- The Anatomy of CSS | HCDE532 | Students of Premium Design Works
- Styling Text with CSS | HCDE532 | Students of Premium Design Works
Therefore, let’s create an embedded/internal style sheet in your index file:
1 2 3 4 5 6 7 8 9 10 11 12 13 14 15 16 17 18 19 20 21 22 23 24 25 26 27 28 29 30 31 32 33 34 35 36 37 38 39 40 41 42 43 44 45 46 47 48 49 50 51 52 53 54 55 56 |
<style type="text/css" media="all">

* { margin: 0; padding: 0; }

body {
background-color:#FFFFFF;
font-family: Arial, Helvetica, sans-serif;
color: #000000;
}

h1 {
width: 620px;
font-size: 36px;
line-height: 36px;
margin-top: 25px;
margin-bottom: 20px;
margin-left: 50px;
border-bottom: 1px solid #000000;
}

h2 {
width: 620px;
font-size: 24px;
line-height: 24px;
padding-top: 8px;
margin-bottom: 2px;
margin-left: 50px;
}

h3 {
width: 620px;
font-size: 18px;
line-height: 18px;
padding-top: 8px;
margin-bottom: 2px;
margin-left: 50px;
}

p {
width: 620px;
font-size: 16px;
line-height: 24px;
margin-bottom: 10px;
margin-left: 50px;
}

ol, ul {
width: 620px;
font-size: 16px;
line-height: 24px;
padding-left: 40px;
margin-bottom: 10px;
margin-left: 50px;
}

</style>
|
See Also:
- CSS How To | W3 Schools
- CSS Syntax | W3 Schools
- CSS Selectors | W3 Schools
Step Five: Upload the File to your Server
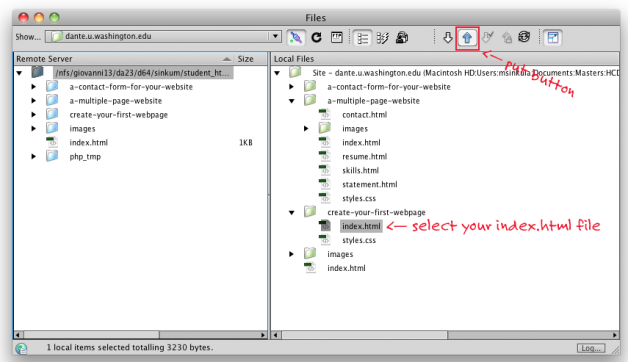
You can now select the “index.html” file and upload it to your server via the “put” button:
You should now see your HTML file on your Web Server:
Congrats!! You now have your first web page up and running. Now let’s create a better page layout.
This portion of the Premium Design Works website is written by Mike Sinkula for the Web Design & Development students at Seattle Central College and the Human Centered Design & Engineering students at the University of Washington.


Social