HCDE532 » Using Images
Image files are composed of either pixel or vector (geometric) data that are rasterized to pixels when displayed (with few exceptions) in a vector graphic display. Images are not technically inserted into an HTML page, rather, images are linked to HTML pages.
Creating & Saving Images
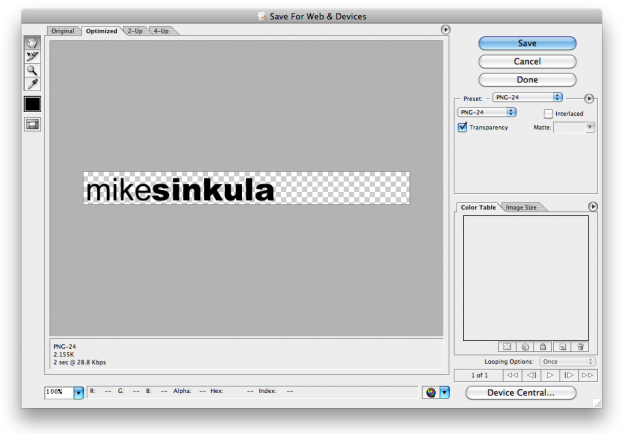
First and foremost, your images that you will use in your web page need to be in the proper format to be viewed in a standard web browser. We will also be saving our files as 72 ppi (pixels per inch) – the standard resolution for web images.
When we save our images for our websites, we will be using the save for web command by choosing File > Save for Web:
There are three main formats to use in your web pages:
- GIF: (Graphics Interchange Format) is limited to an 8-bit palette, or 256 colors. This makes the GIF format suitable for storing graphics with relatively few colors such as simple diagrams, shapes, logos and cartoon style images.
- JPEG: (Joint Photographic Experts Group) is a compression method. Nearly every digital camera can save images in the JPEG format, which supports 8 bits per color (red, green, blue) for a 24-bit total, producing relatively small files. When not too great, the compression does not noticeably detract from the image’s quality, but JPEG files suffer generational degradation when repeatedly edited and saved.
- PNG: (Portable Network Graphics) file format was created as the free, open-source successor to the GIF. The PNG file format supports truecolor (16 million colors) while the GIF supports only 256 colors. The PNG file excels when the image has large, uniformly colored areas.
Using the Image Tag
Once you have created your image to your liking, it is then time to implement your image into your HTML page by using the <img> tag.
See Also: HTML Images | W3 Schools
The <img> tag is empty, which means that it contains attributes only, and has no closing tag:
1 |
<img src="images/logo.png" />
|
Notice that the value of the image has the path images/ as this refers to the folder that the actual image
file is in.
The Alt Attribute
Let’s add an ALT attribute with a value as well as this will serve a couple of different purposes:
1 |
<img src="images/logo.png" alt="Company Name" />
|
Where alt is the attribute that allows us to display the value (text) of “Company Name” instead of our image in cases of where the user has images turned off. When the user is using a screen reader, the value will get read aloud to that user.
Height & Width
The height and width attributes are used to specify the height and width of an image.
Using height and width attributes will make sure that your picture does indeed appear in the browser at this size and may even speed up the download process because the browser doesn’t need to read the dimensions from the image itself.
The attribute values are specified in pixels by default:
1 |
<img src="images/logo.png" alt="Company Name" height="100" width="250" />
|
Floating Images
Many times you will want to wrap text around your image.
You will need to float your image in order for text to wrap around it:
1 |
<img id="picture" src="images/img-myface.jpg" alt="Mike Sinkula is a Clown" height="175" width="150" />
|
1 2 3 4 5 6 7 |
#picture {
float: right;
margin-left: 10px;
margin-bottom: 10px;
padding: 8px;
border: 2px solid #CCC;
}
|
View: http://students.washington.edu/sinkum/a-multiple-page-website/index.html
Using Background Images
Using background images and colors has become the standard way of using images for graphical art purposes in our websites:
1 2 3 4 5 |
#navigation-items li a:hover {
background-image: url(images/bg-navitems-arrow.png);
background-position: right;
background-repeat: no-repeat;
}
|
There are 3 main parts to styling a bacgkground image:
- Background-image: specifies an image to use as the background of an element
- Background-position: calls out the position of the background image
- Background-repeat: calls out how the background image will repeat or not
See Also:
- Styling Backgrounds | W3 Schools
- HTML Colornames | W3 Schools
- Using Imagery on the Web | WEB200 | Premium Design Works
- Basic Web Page Background Techniques with CSS | Line25
This portion of the Premium Design Works website is written by Mike Sinkula for the Web Design & Development students at Seattle Central College and the Human Centered Design & Engineering students at the University of Washington.


Social